主页 > imtoken地址是什么 > 以太坊Geth共识算法源码分析
以太坊Geth共识算法源码分析
共识算法
目前,以太坊中有两种公式算法的实现,分别是clique和ethash。 其中clique是PoA共识的实现,ethash是PoW共识的实现,对应的代码位于go-ethereum/consensus目录下。
PoW (ethash) 工作量证明定义
PoW 和 PoA 的区别在于,PoW 是一种共识机制,每个人都可能拥有出块权,而 PoA 通过“选举专家”来确认出块权。 PoW 可以总结如下:
PoW用来对人人可以参与的区块链项目的出块权进行确权。确权的方式是通过计算满足一定的条件。这个计算必须是复杂的、耗时的;而条件的验证最好是非常简单能快速完成的。
基本的 Pow 实现思路如下:
Ethash实现方案算法设计要求
以太坊中的共识算法ethash的实现思路与上述题目一致,但hash算法使用的数据源却大不相同。
同时,以下是ethash官方共识算法的设计指南:
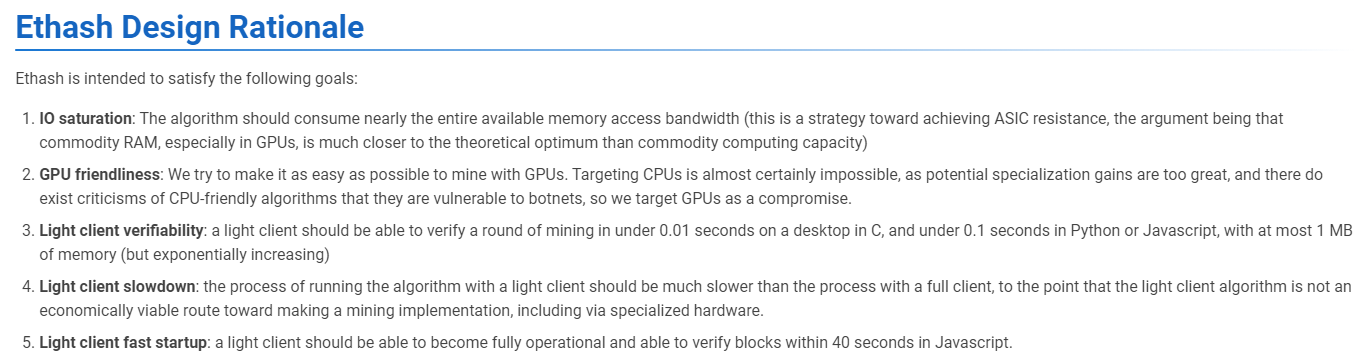
首先,它要求算法是IO饱和的,也就是说算法在执行过程中需要占用几乎所有的内存读写带宽(需要不断读写内存,达到saturation),从而避免了对ASIC等专用挖矿设备的需求(这种设备应该针对某种哈希计算进行了优化,但设备中的内存很小); GPU友好,即GPU可以用来挖矿; 轻量级客户端可以快速验证挖矿结果; 但是,轻量级客户端的挖矿速度较慢。识别方法
首先,Geth中以太坊区块链的区块头定义如下:
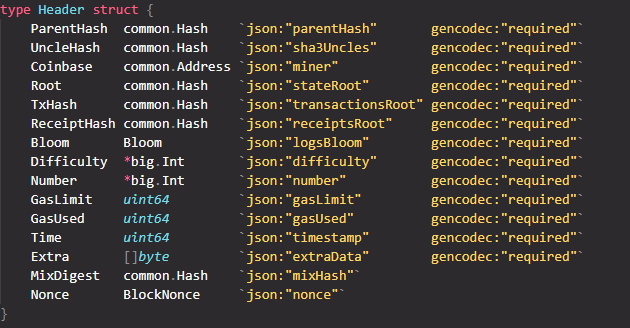
其中,Difficulty字段表示当前“出块难度”。 ethash 计算出的哈希值作为一个整数使用,必须小于 2256/Difficulty2^{256}/Difficulty2256/Difficulty 才可以认为这个哈希有效。
另外,注意以太坊在区块头中还包含了一个MixDigest字段,这是由于ethash算法中的额外验证所致。 所以ethash在计算hash的时候会得到两个值。 除了hash值用来和Difficulty比较,另一个是用来和MixDigest比较。 同时,如果要通过验证,哈希值必须与MixDigest字段一致。
综上所述,ethash的验证方式可以概括为:
后续会介绍digest和result这两个hash值是如何计算的。
难度调整
Ethash 实现了区块难度要求的动态调整,大致保证了区块生成时间间隔的稳定性。 以太坊的发布分为四个阶段:Frontier、Homestead、Metropolis、Serenity。 每个阶段对应的难度计算公式有些不同。
同时,Metropolis阶段的硬分叉有两个版本,分别是拜占庭分叉和君士坦丁堡分叉。
由于以太坊设计的最初计划是使用PoW共识作为过渡,所以最终的以太坊将使用PoS作为共识而放弃PoW。 如果这个转换过程处理不当,势必会损害部分矿工的利益。 因此,在Frontier的初始阶段,以太坊的设计者在难度计算公式中加入了指数变化的部分(这种设计被称为“难度炸弹”)。 目的是让矿工对难度变化有预期,不会投入过多的资源购买挖矿硬件,实现从PoW到PoS的平滑过渡。 但由于以太坊的共识计划转型很久没有完成,此时挖矿难度的增加导致区块很难或几乎不可能出块,这段时期被称为“冰河时代”。 推出了两次硬分叉,主要目的是延缓挖矿难度的上升趋势(可能降低挖矿难度),以等待共识机制的转变。 这两个分叉被称为“延迟难度炸弹”。
另外,后续的“缪尔冰川”升级也是为了“延迟难度炸弹”(宁静版发布前夕,“伊斯坦布尔”升级,“缪尔冰川”升级和“柏林”先后经历了升级,但由于Serenity版本发布过程中网络遇到的各种问题不断推迟,而Serenity版本的发布意味着以太坊从1.0版本到2.0版本的转变)。
哈希数据源
对于前面介绍的基础PoW,我们使用区块头作为哈希计算的数据源。 由于以太坊希望ethash能够抵抗ASIC矿机,因此ethash除了利用区块头信息外,还需要更大的数据集作为数据源来计算hash。
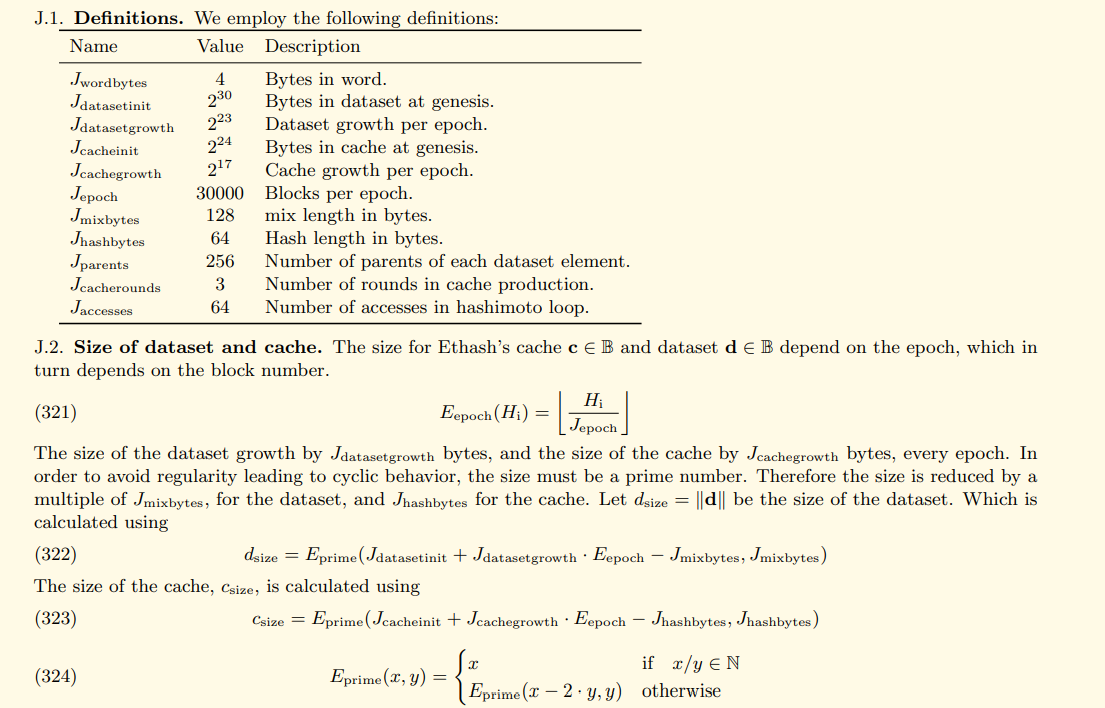
那么以太坊是如何解决 ASIC 矿机问题的呢? 简单来说,它被内存限制所抵制。 原因如下。 一是ASIC矿机使用大内存成本更高; 二是在随机读取大量内存数据时,计算速度不仅受计算单元的限制,还受内存的读出速度的限制。 因为在ethash中,首先计算hash需要维护一个初始大小为1G的数据集(另外还有一个缓存数据集),这个数据集的大小会随着区块链的长度而增长。 不断增加(这是为了配合硬件的不断发展),黄皮书已经给出了具体的数据集大小变化公式:
计算hash的数据源来自这个数据集; 而正是区块头数据和Nonce字段决定了数据集中的哪些数据用于哈希计算。 此外,ethash 中使用的这种方法可以看作是“Dagger-Hashimoto”算法的变体。
为了表达方便,后面我们会用dataset来表示这个数据集。
匕首
Dagger 算法定义了数据集的生成和组织方式。
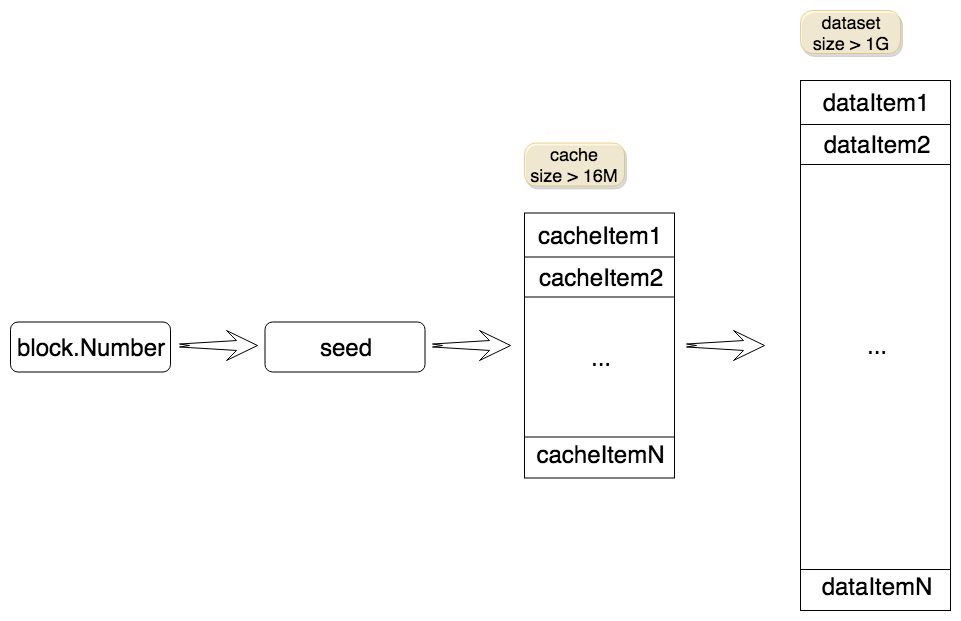
我们可以认为dataset是由多个dataitem组成的庞大数据,每个dataitem是一个64字节的字节数组(可以理解为hash)。 每个数据项都是由缓存数据集(cache)生成的。 同样,缓存也可以认为是由多个缓存项组成的。 每个cacheitem也是一个hash,但是cache占用的空间比dataset小很多。
生成数据项的步骤大致如下:从缓存中选择一个缓存项进行计算,得到的结果将用于下一次计算。 这个过程会重复256次(相当于某个cacheitem经过256次计算得到的结果)。 缓存由种子产生,种子的值与区块高度有关。 根据黄皮书中的定义,种子计算如下:

综上所述,数据集生成的大致流程如下图所示:
Dagger 的另一个关键点是确定性。 即在同一个epoch(以太坊定义每30000个区块为一个epoch),每次计算的种子、缓存、数据集都是相同的(具体计算方法见黄皮书)。 否则,对于同一个区块,矿工和验证者使用不同的数据集,无法进行验证。 在以太坊的文档中,这个庞大的数据集被称为 DAG。
数据集作为哈希计算的数据源,既保证了挖矿必须使用大量内存,又使得验证更加容易。 原因如下:
挖矿是一个反复试验的过程。 如果矿工不维护数据集,他们需要计算每次尝试所需的数据项。 这种重新计算过程与直接从维护的数据集中获取相应的数据项相比。 这是相当耗时的。 因此,如果不占用内存来维护这个数据集,那么挖矿必然会消耗大量的计算成本,从而迫使矿工放弃这种做法。 如果一个节点只是需要验证接收到的块,那么它只需要保存缓存,如果在验证过程中缺少相应的数据项,则通过缓存生成相应的数据项。 由于验证过程只执行一次,因此它的开销可以忽略不计。 桥本
桥本算法使用区块头数据和 Nonce 字段以及生成的数据集来生成最终的哈希值。 一般步骤如下:
首先,通过哈希区块头(不包括Nonce和MixDigest)和Nonce值生成一个初始哈希;
经过计算,需要得到数据项在dataset数据集中的索引;
拿到dataitem后,聚合到mix变量中;
最后返回mix值和计算结果(验证时将mix值与区块头的MixDigest进行比较,结果与区块头的Difficulty进行比较,如果满足条件,则表明是一个已成功挖出有效区块)。
ethash源码分析
ethash模块实现的源码位于go-ethereum/consensus/ethash目录下。 该目录下的文件及其对应的代码函数如下:
ethash模块下的几个重要函数是MakeCache()函数、MakeDataset()函数、Ethash.Seal()和Ethash.VerifySeal()函数。 它们的作用是生成缓存集,生成哈希运算数据集,挖掘打包区块,验证打包区块。 这些函数最终会调用generateCache()或generateDataset()这两个函数生成相应的数据,这些函数的调用过程如下图所示:

generateCache()和generateDataset()这两个函数也是生成缓存数据和数据集数据的真正实现。 在接下来的内容中,我们将详细分析这两个函数的实现。
数据存储
请注意,缓存数据和数据集数据不仅存储在内存中,它们还可以存储在用户的磁盘上。 如果每次都需要重新生成这些数据集,会花费一些不必要的计算时间,所以将数据保存在磁盘中,下次需要的时候直接从磁盘中读取,可以节省很多这些时间开销。 ethash.go中定义了缓存结构和数据集结构以太坊dag大小查询,方便缓存数据和数据集数据的初始化以及磁盘文件的存储。 它们的定义如下:
type cache struct {
	epoch uint64    // Epoch for which this cache is relevant
	dump  *os.File  // File descriptor of the memory mapped cache
	mmap  mmap.MMap // Memory map itself to unmap before releasing
	cache []uint32  // The actual cache data content (may be memory mapped)
	once  sync.Once // Ensures the cache is generated only once
}
type dataset struct {
	epoch   uint64    // Epoch for which this cache is relevant
	dump    *os.File  // File descriptor of the memory mapped cache
	mmap    mmap.MMap // Memory map itself to unmap before releasing
	dataset []uint32  // The actual cache data content
	once    sync.Once // Ensures the cache is generated only once
	done    uint32    // Atomic flag to determine generation status
}
其中dump和mmap字段负责磁盘数据的读写操作。 另外,once字段用于保证数据的初始化只执行一次。 后面我们提到cache和dataset只是指的是里面存储的字节数据,而不是这个结构体。
数据生成
前面我们提到,generateCache()和generateDataset()这两个函数负责实际生成缓存数据和数据集数据,它们位于algorithm.go文件中。
首先,对于generateCache()函数,其主要代码(省略一些不重要的代码)如下:
func generateCache(dest []uint32, epoch uint64, seed []byte) {
	...
	// Convert our destination slice to a byte buffer
	var cache []byte
	...
	// Calculate the number of theoretical rows (we'll store in one buffer nonetheless)
	size := uint64(len(cache))
	rows := int(size) / hashBytes
	...

	// Create a hasher to reuse between invocations
	keccak512 := makeHasher(sha3.NewLegacyKeccak512())
	// Sequentially produce the initial dataset
	keccak512(cache, seed)
	for offset := uint64(hashBytes); offset < size; offset += hashBytes {
		keccak512(cache[offset:], cache[offset-hashBytes:offset])
		...
	}
	// Use a low-round version of randmemohash
	temp := make([]byte, hashBytes)
	for i := 0; i < cacheRounds; i++ {
		for j := 0; j < rows; j++ {
			var (
				srcOff = ((j - 1 + rows) % rows) * hashBytes
				dstOff = j * hashBytes
				xorOff = (binary.LittleEndian.Uint32(cache[dstOff:]) % uint32(rows)) * hashBytes
			)
			bitutil.XORBytes(temp, cache[srcOff:srcOff+hashBytes], cache[xorOff:xorOff+hashBytes])
			keccak512(cache[dstOff:], temp)
			...
		}
	}

    ...
}
从上面代码可以看出,每个缓存可以分为多个缓存项,每个缓存项的大小为hashBytes(64字节)。 缓存数据的生成过程如下:
首先,使用种子进行KEC512计算,保存在第0个cacheitem中(代码17); 从第一个cacheitem开始,后一个cacheitem是前一个cacheitem的KEC512哈希值,依次计算(代码18-21行); 循环cacheRounds次,每次循环所有变量的cacheitem,根据黄皮书(代码25-37行)给出的公式更新对应的cacheitem。
对于generateDataset()函数,简化代码如下:
func generateDataset(dest []uint32, epoch uint64, cache []uint32) {
	...
	// Convert our destination slice to a byte buffer
	var dataset []byte
	...
	// Generate the dataset on many goroutines since it takes a while
	threads := runtime.NumCPU()
	size := uint64(len(dataset))
	var pend sync.WaitGroup
	pend.Add(threads)
	var progress uint64
	for i := 0; i < threads; i++ {
		go func(id int) {
			defer pend.Done()
			// Create a hasher to reuse between invocations
			keccak512 := makeHasher(sha3.NewLegacyKeccak512())
			// Calculate the data segment this thread should generate
			batch := (size + hashBytes*uint64(threads) - 1) / (hashBytes * uint64(threads))
			first := uint64(id) * batch
			limit := first + batch
			if limit > size/hashBytes {
				limit = size / hashBytes
			}
			// Calculate the dataset segment
			for index := first; index < limit; index++ {
				item := generateDatasetItem(cache, uint32(index), keccak512)
				...
				copy(dataset[index*hashBytes:], item)
				...
			}
		}(i)
	}
	// Wait for all the generators to finish and return
	pend.Wait()
}
generateDataset()函数主要是根据CPU线程数,将任务分配给多个go线程。 每个go线程负责生成指定索引索引区间内的所有数据项。 最后将所有这些dataitem组合起来就是我们需要的dataset数据集。 因此,我们着重分析第31行调用generateDatasetItem()函数的代码,其作用是生成指定索引的dataitem。 主要代码内容如下:
func generateDatasetItem(cache []uint32, index uint32, keccak512 hasher) []byte {
	// Calculate the number of theoretical rows (we use one buffer nonetheless)
	rows := uint32(len(cache) / hashWords)
	// Initialize the mix
	mix := make([]byte, hashBytes)
	binary.LittleEndian.PutUint32(mix, cache[(index%rows)*hashWords]^index)
	for i := 1; i < hashWords; i++ {
		binary.LittleEndian.PutUint32(mix[i*4:], cache[(index%rows)*hashWords+uint32(i)])
	}
	keccak512(mix, mix)
	// Convert the mix to uint32s to avoid constant bit shifting
	intMix := make([]uint32, hashWords)
	for i := 0; i < len(intMix); i++ {
		intMix[i] = binary.LittleEndian.Uint32(mix[i*4:])
	}
	// fnv it with a lot of random cache nodes based on index
	for i := uint32(0); i < datasetParents; i++ {
		parent := fnv(index^i, intMix[i%16]) % rows
		fnvHash(intMix, cache[parent*hashWords:])
	}
	// Flatten the uint32 mix into a binary one and return
	for i, val := range intMix {
		binary.LittleEndian.PutUint32(mix[i*4:], val)
	}
	keccak512(mix, mix)
	return mix
}
注意代码第3行rows的计算方法,因为缓存中的数据项是以uint32的形式存储的,所以这行代码的计算结果就是缓存数据中cacheitem项的个数。 代码中cache[(index%rows)*hashWords]的访问方式是为了保证以cacheitem为单位对缓存进行访问。 因此,dataitem的生成过程如下:
获取索引cacheitem与缓存中索引的异或结果,然后进行KEC512哈希运算(代码8-12行);
然后循环执行相应的计算datasetParents次(具体计算公式见黄皮书),每次计算的结果都会作为下一次计算的输入(代码20-23行);
循环结束后,再次对结果进行KEC512哈希运算并输出(代码行28);
工作证明功能
以太坊的工作量证明函数是hashimoto(),会在hashimotoLight()和hashimotoFull()中调用。 这两个函数的主要区别是前者使用缓存数据,在调用过程中生成需要的dataset数据来提供工作量证明,而后者直接使用dataset数据提供工作量证明,所以前者一般用于验证块,而后者在挖矿过程中被调用。 hashimoto()函数的主要代码如下:
// hashimoto aggregates data from the full dataset in order to produce our final
// value for a particular header hash and nonce.
func hashimoto(hash []byte, nonce uint64, size uint64, lookup func(index uint32) []uint32) ([]byte, []byte) {
	// Calculate the number of theoretical rows (we use one buffer nonetheless)
	rows := uint32(size / mixBytes)
	// Combine header+nonce into a 64 byte seed
	seed := make([]byte, 40)
	copy(seed, hash)
	binary.LittleEndian.PutUint64(seed[32:], nonce)
	seed = crypto.Keccak512(seed)
	seedHead := binary.LittleEndian.Uint32(seed)
	// Start the mix with replicated seed
	mix := make([]uint32, mixBytes/4)
	for i := 0; i < len(mix); i++ {
		mix[i] = binary.LittleEndian.Uint32(seed[i%16*4:])
	}

	// Mix in random dataset nodes
	temp := make([]uint32, len(mix))
	for i := 0; i < loopAccesses; i++ {
		parent := fnv(uint32(i)^seedHead, mix[i%len(mix)]) % rows
		for j := uint32(0); j < mixBytes/hashBytes; j++ {
			copy(temp[j*hashWords:], lookup(2*parent+j))
		}
		fnvHash(mix, temp)
	}

	// Compress mix
	for i := 0; i < len(mix); i += 4 {
		mix[i/4] = fnv(fnv(fnv(mix[i], mix[i+1]), mix[i+2]), mix[i+3])
	}
	mix = mix[:len(mix)/4]
	digest := make([]byte, common.HashLength)
	for i, val := range mix {
		binary.LittleEndian.PutUint32(digest[i*4:], val)
	}
	return digest, crypto.Keccak256(append(seed, digest...))
}
该函数最终返回两个输出。 在挖矿过程中,如果挖矿成功,第一个输出将作为MixDigest放入区块头。 在验证过程中,会与区块头中的 MixDigest 字段进行比较,以验证区块的正确性,并将二次输出与区块头中的 Difficulty 字段进行比较,以确定是否满足工作量证明。 其工作流程如下:
首先将区块头哈希(不包括Nonce和MixDigest字段)与nonce拼接,然后计算KEC512哈希得到种子(代码7-12行); 然后用得到的seed初始化mix数据,相当于把seed和自己拼接一次得到mix(代码15-19行); 然后循环loopAccesses次,每次计算索引parent,然后根据索引调用lookup函数获取对应的dataset数据,将获取到的数据放入temp中,然后mix用temp计算FNV函数,更新mix(代码 21-29 行); 然后循环执行对mix的compress操作(代码31-35行,具体公式见黄皮书); 最后,修改mix的格式,放入digest作为第一个输出,seed和digest拼接为第二个输出(代码37-41行)。
该函数会在hashimotoLight()和hashimotoFull()中被调用,它们调用的具体形式如下:
// hashimotoLight aggregates data from the full dataset (using only a small
// in-memory cache) in order to produce our final value for a particular header
// hash and nonce.
func hashimotoLight(size uint64, cache []uint32, hash []byte, nonce uint64) ([]byte, []byte) {
	keccak512 := makeHasher(sha3.NewLegacyKeccak512())
	lookup := func(index uint32) []uint32 {
		rawData := generateDatasetItem(cache, index, keccak512)
		data := make([]uint32, len(rawData)/4)
		for i := 0; i < len(data); i++ {
			data[i] = binary.LittleEndian.Uint32(rawData[i*4:])
		}
		return data
	}
	return hashimoto(hash, nonce, size, lookup)
}
// hashimotoFull aggregates data from the full dataset (using the full in-memory
// dataset) in order to produce our final value for a particular header hash and
// nonce.
func hashimotoFull(dataset []uint32, hash []byte, nonce uint64) ([]byte, []byte) {
	lookup := func(index uint32) []uint32 {
		offset := index * hashWords
		return dataset[offset : offset+hashWords]
	}
	return hashimoto(hash, nonce, uint64(len(dataset))*4, lookup)
}
主要区别在于输入参数查找函数的形式不同。 第一个函数每次需要根据缓存和索引生成对应的datasetitem,而第二个函数只需要获取内存中记录的index对应的datasetitem即可。
矿业
矿工在挖矿时会依次调用Engine接口的Prepare()、Finalize()、Seal()函数。 它们的作用是计算并填充区块头的Difficulty值,计算区块中交易执行后的Difficulty值。 state 放入区块头的 Root 字段,进行挖矿操作。 前两个函数的实现比较简单(它们的实现位于ethash中的ethash/consenus.go文件中),对应的代码如下:
// Prepare implements consensus.Engine, initializing the difficulty field of a
// header to conform to the ethash protocol. The changes are done inline.
func (ethash *Ethash) Prepare(chain consensus.ChainHeaderReader, header *types.Header) error {
	parent := chain.GetHeader(header.ParentHash, header.Number.Uint64()-1)
	if parent == nil {
		return consensus.ErrUnknownAncestor
	}
	header.Difficulty = ethash.CalcDifficulty(chain, header.Time, parent)
	return nil
}
// Finalize implements consensus.Engine, accumulating the block and uncle rewards,
// setting the final state on the header
func (ethash *Ethash) Finalize(chain consensus.ChainHeaderReader, header *types.Header, state *state.StateDB, txs []*types.Transaction, uncles []*types.Header) {
	// Accumulate any block and uncle rewards and commit the final state root
	accumulateRewards(chain.Config(), state, header, uncles)
	header.Root = state.IntermediateRoot(chain.Config().IsEIP158(header.Number))
}
对于Seal()函数(其在ethash中的实现位于ethash/sealer.go文件中),其主要代码内容如下:
// Seal implements consensus.Engine, attempting to find a nonce that satisfies
// the block's difficulty requirements.
func (ethash *Ethash) Seal(chain consensus.ChainHeaderReader, block *types.Block, results chan<- *types.Block, stop <-chan struct{}) error {
	...

	threads := ethash.threads
	...

	if threads == 0 {
		threads = runtime.NumCPU()
	}
	if threads < 0 {
		threads = 0 // Allows disabling local mining without extra logic around local/remote
	}
	// Push new work to remote sealer
	if ethash.remote != nil {
		ethash.remote.workCh <- &sealTask{block: block, results: results}
	}
	var (
		pend   sync.WaitGroup
		locals = make(chan *types.Block)
	)
	for i := 0; i < threads; i++ {
		pend.Add(1)
		go func(id int, nonce uint64) {
			defer pend.Done()
			ethash.mine(block, id, nonce, abort, locals)
		}(i, uint64(ethash.rand.Int63()))
	}
	// Wait until sealing is terminated or a nonce is found
	go func() {
		...
		pend.Wait()
	}()
	return nil
}
其中,代码第23-29行创建了多个线程同时进行挖矿,并等待挖矿结果,挖矿的主要工作是通过调用Ethash.mine()函数实现的。 内容如下:
// mine is the actual proof-of-work miner that searches for a nonce starting from
// seed that results in correct final block difficulty.
func (ethash *Ethash) mine(block *types.Block, id int, seed uint64, abort chan struct{}, found chan *types.Block) {
	// Extract some data from the header
	var (
		header  = block.Header()
		hash    = ethash.SealHash(header).Bytes()
		target  = new(big.Int).Div(two256, header.Difficulty)
		number  = header.Number.Uint64()
		dataset = ethash.dataset(number, false)
	)
	// Start generating random nonces until we abort or find a good one
	var (
		attempts = int64(0)
		nonce    = seed
	)
	...
search:
	for {
		select {
		case <-abort:
            ...
			break search
		default:
			attempts++
			...

			// Compute the PoW value of this nonce
			digest, result := hashimotoFull(dataset.dataset, hash, nonce)
			if new(big.Int).SetBytes(result).Cmp(target) <= 0 {
				// Correct nonce found, create a new header with it
				header = types.CopyHeader(header)
				header.Nonce = types.EncodeNonce(nonce)
				header.MixDigest = common.BytesToHash(digest)
				// Seal and return a block (if still needed)
				select {
				case found <- block.WithSeal(header):
					...
				case <-abort:
					...
				}
				break search
			}
			nonce++
		}
	}
	...
}
Seal()函数在调用mine()函数时,首先传入一个随机生成的nonce初始值,然后使用这个初始值和区块头的hash(不包括Nonce和MixDigest)调用hashimotoFull()函数来得到结果分别存入digest和result中,然后将结果与block header中的Difficulty进行比较,看是否满足工作量证明。 如果满足,则说明挖矿成功,则将此时的摘要和nonce写入区块头的MixDigest和Nonce字段; 否则,将nonce的值修改为nonce+1,继续循环。
多节点远程挖矿
我们在分析Seal()函数的时候,可以注意到函数中有几行代码,内容如下:
func (ethash *Ethash) Seal(chain consensus.ChainHeaderReader, block *types.Block, results chan<- *types.Block, stop <-chan struct{}) error {
	...
	// Push new work to remote sealer
	if ethash.remote != nil {
		ethash.remote.workCh <- &sealTask{block: block, results: results}
	}
	...
}
从注释可以看出,这段代码的主要作用是将当前工作提交到远程节点进行挖矿。 那么远程节点如何接受这些信息呢? 我们可以观察到,在使用ethash/ethash.go文件中的New函数初始化Ethash对象时,会调用startRemoteSealer()函数,startRemoteSealer()函数会开启一个线程接收相应的工作信息。 主要代码如下:
func New(config Config, notify []string, noverify bool) *Ethash {
	...
	ethash.remote = startRemoteSealer(ethash, notify, noverify)
	...
}
func startRemoteSealer(ethash *Ethash, urls []string, noverify bool) *remoteSealer {
	...
	go s.loop()
	...
}
func (s *remoteSealer) loop() {
	...
	for {
		select {
		case work := <-s.workCh:
			// Update current work with new received block.
			// Note same work can be past twice, happens when changing CPU threads.
			s.results = work.results
			s.makeWork(work.block)
			s.notifyWork()
		...
		}
	}
}
接收到通道中传递的信息后,会分别调用makeWork()和notifyWork()两个函数,对要传输的信息和打包后的信息进行打包。 主要代码如下:
func (s *remoteSealer) makeWork(block *types.Block) {
	hash := s.ethash.SealHash(block.Header())
	s.currentWork[0] = hash.Hex()
	s.currentWork[1] = common.BytesToHash(SeedHash(block.NumberU64())).Hex()
	s.currentWork[2] = common.BytesToHash(new(big.Int).Div(two256, block.Difficulty()).Bytes()).Hex()
	s.currentWork[3] = hexutil.EncodeBig(block.Number())
	// Trace the seal work fetched by remote sealer.
	s.currentBlock = block
	s.works[hash] = block
}
func (s *remoteSealer) notifyWork() {
	work := s.currentWork
	blob, _ := json.Marshal(work)
	s.reqWG.Add(len(s.notifyURLs))
	for _, url := range s.notifyURLs {
		go s.sendNotification(s.notifyCtx, url, blob, work)
	}
}
func (s *remoteSealer) sendNotification(ctx context.Context, url string, json []byte, work [4]string) {
	...
	req, err := http.NewRequest("POST", url, bytes.NewReader(json))
	...
	ctx, cancel := context.WithTimeout(ctx, remoteSealerTimeout)
	...
}
另外,远程节点可以调用api接口中的GetWork()和SubmitWork()获取远程节点传递过来的信息,提交挖矿结果。
其实这是一个简单的支持矿池挖矿的基础功能。 这里不得不提一下stratum协议,它是一个完整的支持矿池挖矿的协议,但是以太坊并不支持这个协议,只是提供了简单的eth_getWork和eth_submitWork接口。
PoA(集团)
PoA以太坊dag大小查询,全称Proof of Authority,中文翻译为权威证明。 PoA的基本思想应该也来自于现实世界:在现实世界中,我们往往会为很多事情“诉诸权威”,也就是相信专家。 PoA的思路类似这样:授权一定数量的“专家”,这些人相互合作打包区块,维护区块链,其他人无权打包区块,普通人认为那些成为专家的人会努力维护区块链的正常秩序。
PoA牺牲了一些去中心化的特性,换取了一种可控性。 同时,在设计时还有两个问题必须解决。 这里我们将实施区块打包和维护的专家称为签名者。 那么问题可以表述为:
派系设计理念
首先,在介绍clique算法之前,需要先解释一下算法中用到的几个名字:
clique算法和ethash算法的块头数据结构相同,只是部分字段记录的内容不同,如下表所示:
现场工作量证明
币库
挖矿奖励地址
普通块表示投票人的地址; CHECKPOINT 块的字段全为零
随机数
满足工作量证明的随机数
普通区块中的投票结果(表示增加或删除选民); CHECKPOINT 块的字段全为零
混合文摘
混合文摘
该字段全为零
哈希叔叔
叔块总结
该字段全为零
困难
挖矿难度
1或2,代码状态分别为DIFF_NOTURN和DIFF_INTURN
额外的
额外数据
在普通区块中,区块头上有一个32字节的空前缀+65字节的当前区块生产者的签名; 对于CHECKPOINT区块,这个字节是一个32字节的空前缀+所有签名者的地址列表+一个65字节的当前区域区块生产者在区块头上的签名
接下来我们观察clique算法是如何解决以上两个问题的。
Clique源码解析投票信息记录
Snapshot对象是clique中比较重要的一个对象。 其功能是统计某轮的投票信息和当前签名者名单。 这个数据结构在后续无论是区块打包还是区块验证都会被反复使用。 相关信息。 同时以checkpointInterval=1024为周期,每隔一个周期(1024个blocks)将数据结构保存在磁盘上,当需要对应的Snapshot时,如果磁盘上存在,也可以直接从磁盘读入。相关代码位于go-ethereum/consensus/clique/snapshot.go文件中。 Snapshot对象的定义如下:
// Snapshot is the state of the authorization voting at a given point in time.
type Snapshot struct {
	config   *params.CliqueConfig // Consensus engine parameters to fine tune behavior
	sigcache *lru.ARCCache        // Cache of recent block signatures to speed up ecrecover
	Number  uint64                      `json:"number"`  // Block number where the snapshot was created
	Hash    common.Hash                 `json:"hash"`    // Block hash where the snapshot was created
	Signers map[common.Address]struct{} `json:"signers"` // Set of authorized signers at this moment
	Recents map[uint64]common.Address   `json:"recents"` // Set of recent signers for spam protections
	Votes   []*Vote                     `json:"votes"`   // List of votes cast in chronological order
	Tally   map[common.Address]Tally    `json:"tally"`   // Current vote tally to avoid recalculating
}
其中,Signers 字段表示签名者列表,Recents 表示最近一个区块的签名者地址,Votes 是所有投票信息的集合,Tally 表示对某个投票者的所有投票的总和。 Vote和Tally对象的具体定义如下
// Vote represents a single vote that an authorized signer made to modify the
// list of authorizations.
type Vote struct {
	Signer    common.Address `json:"signer"`    // Authorized signer that cast this vote
	Block     uint64         `json:"block"`     // Block number the vote was cast in (expire old votes)
	Address   common.Address `json:"address"`   // Account being voted on to change its authorization
	Authorize bool           `json:"authorize"` // Whether to authorize or deauthorize the voted account
}
// Tally is a simple vote tally to keep the current score of votes. Votes that
// go against the proposal aren't counted since it's equivalent to not voting.
type Tally struct {
	Authorize bool `json:"authorize"` // Whether the vote is about authorizing or kicking someone
	Votes     int  `json:"votes"`     // Number of votes until now wanting to pass the proposal
}
从代码中我们可以看出,Vote代表了一次投票的详细信息,其中字段Signer代表投票人,Address代表投票人,Block代表投票所在区块,Authorize代表是添加还是删除投票; Tally代表投票者的投票结果统计,其中Authorize代表是否增加或删除选票,Votes代表相应选票的总和。
对于Snapshot对象,其中一个重要的函数是apply()函数,它接收一个区块头分片作为输入,统计这些区块头的所有投票信息,最后更新当前Snapshot对象并输出。 其简化代码如下:
// apply creates a new authorization snapshot by applying the given headers to
// the original one.
func (s *Snapshot) apply(headers []*types.Header) (*Snapshot, error) {
	// Allow passing in no headers for cleaner code
	...
	// Sanity check that the headers can be applied
	...(保证区块头部数据是有序的)
	// Iterate through the headers and create a new snapshot
	snap := s.copy()
	...
	for i, header := range headers {
		// Remove any votes on checkpoint blocks
		number := header.Number.Uint64()
		if number%s.config.Epoch == 0 {
			snap.Votes = nil
			snap.Tally = make(map[common.Address]Tally)
		}
		// Delete the oldest signer from the recent list to allow it signing again
		if limit := uint64(len(snap.Signers)/2 + 1); number >= limit {
			delete(snap.Recents, number-limit)
		}
		// Resolve the authorization key and check against signers
		signer, err := ecrecover(header, s.sigcache)
		if err != nil {
			return nil, err
		}
		if _, ok := snap.Signers[signer]; !ok {
			return nil, errUnauthorizedSigner
		}
		for _, recent := range snap.Recents {
			if recent == signer {
				return nil, errRecentlySigned
			}
		}
		snap.Recents[number] = signer
		// Header authorized, discard any previous votes from the signer
		for i, vote := range snap.Votes {
			if vote.Signer == signer && vote.Address == header.Coinbase {
				// Uncast the vote from the cached tally
				snap.uncast(vote.Address, vote.Authorize)
				// Uncast the vote from the chronological list
				snap.Votes = append(snap.Votes[:i], snap.Votes[i+1:]...)
				break // only one vote allowed
			}
		}
		// Tally up the new vote from the signer
		var authorize bool
		switch {
		case bytes.Equal(header.Nonce[:], nonceAuthVote):
			authorize = true
		case bytes.Equal(header.Nonce[:], nonceDropVote):
			authorize = false
		default:
			return nil, errInvalidVote
		}
		if snap.cast(header.Coinbase, authorize) {
			snap.Votes = append(snap.Votes, &Vote{
				Signer:    signer,
				Block:     number,
				Address:   header.Coinbase,
				Authorize: authorize,
			})
		}
		// If the vote passed, update the list of signers
		if tally := snap.Tally[header.Coinbase]; tally.Votes > len(snap.Signers)/2 {
			if tally.Authorize {
				snap.Signers[header.Coinbase] = struct{}{}
			} else {
				delete(snap.Signers, header.Coinbase)
				// Signer list shrunk, delete any leftover recent caches
				if limit := uint64(len(snap.Signers)/2 + 1); number >= limit {
					delete(snap.Recents, number-limit)
				}
				// Discard any previous votes the deauthorized signer cast
				for i := 0; i < len(snap.Votes); i++ {
					if snap.Votes[i].Signer == header.Coinbase {
						// Uncast the vote from the cached tally
						snap.uncast(snap.Votes[i].Address, snap.Votes[i].Authorize)
						// Uncast the vote from the chronological list
						snap.Votes = append(snap.Votes[:i], snap.Votes[i+1:]...)
						i--
					}
				}
			}
			// Discard any previous votes around the just changed account
			for i := 0; i < len(snap.Votes); i++ {
				if snap.Votes[i].Address == header.Coinbase {
					snap.Votes = append(snap.Votes[:i], snap.Votes[i+1:]...)
					i--
				}
			}
			delete(snap.Tally, header.Coinbase)
		}
		// If we're taking too much time (ecrecover), notify the user once a while
		...
	}
	...
	snap.Number += uint64(len(headers))
	snap.Hash = headers[len(headers)-1].Hash()
	return snap, nil
}
函数执行的大致流程如下:
首先检查传入的块头分片数据的有效性,主要是保证传入的数据是有序的; 然后,遍历每个区块头数据,如果当前区块是CHECKPOINT,则清除所有投票信息; 然后,从Recents字段中清除最早的记录,得到当前区块的签名者地址(使用ecrecover()函数从区块头中恢复签名者地址,同时检查正确性),添加到Recents字段,该字段是为了保证已经签名一段时间的签名者不能再次签名交易; 如果签名者重复为一个人投票,之前的投票信息将被首先清除; 检查当前区块头中的投票信息是否正确,正确则进行投票。 投票过程在 cast() 函数中实现。 它将首先检查投票的有效性。 如果检查通过,则根据投票内容同时修改Votes和Tally字段; 如果投票者的累计票数超过SIGNER_LIMIT,则需要引入或移除该投票者。 如果引入了选民,则更改 Signers 字段; 如果投票者被移除,首先修改Signers字段,然后撤回投票者所投的票。 最后,该选民当前所投的票信息也被删除。 同时,当投票者被移除时,可能会引起SIGNER_LIMIT的变化,因此可能需要重新更新Recents字段。
这里需要注意调用的两个函数,cast()和uncast(),它们的定义如下:
// cast adds a new vote into the tally.
func (s *Snapshot) cast(address common.Address, authorize bool) bool {
	// Ensure the vote is meaningful
	if !s.validVote(address, authorize) {
		return false
	}
	// Cast the vote into an existing or new tally
	if old, ok := s.Tally[address]; ok {
		old.Votes++
		s.Tally[address] = old
	} else {
		s.Tally[address] = Tally{Authorize: authorize, Votes: 1}
	}
	return true
}
// uncast removes a previously cast vote from the tally.
func (s *Snapshot) uncast(address common.Address, authorize bool) bool {
	// If there's no tally, it's a dangling vote, just drop
	tally, ok := s.Tally[address]
	if !ok {
		return false
	}
	// Ensure we only revert counted votes
	if tally.Authorize != authorize {
		return false
	}
	// Otherwise revert the vote
	if tally.Votes > 1 {
		tally.Votes--
		s.Tally[address] = tally
	} else {
		delete(s.Tally, address)
	}
	return true
}
其中,cast()函数还调用了validVote()函数。 validVote() 函数的作用是验证区块的有效性(添加一个不在签名者列表中的节点或移除一个已经在签名者列表中的节点是有效票证)。 cast() 和 uncast() 函数的作用是根据当前投票跟随 Tally 字段。
共识部分(验证和打包区块)
共识部分的相关代码位于go-ethereum/consensus/clique/clique.go文件中。 在介绍clique算法如何校验和打包区块之前,我们先介绍如下数据结构:
// Clique is the proof-of-authority consensus engine proposed to support the
// Ethereum testnet following the Ropsten attacks.
type Clique struct {
	config *params.CliqueConfig // Consensus engine configuration parameters
	db     ethdb.Database       // Database to store and retrieve snapshot checkpoints
	recents    *lru.ARCCache // Snapshots for recent block to speed up reorgs
	signatures *lru.ARCCache // Signatures of recent blocks to speed up mining
	proposals map[common.Address]bool // Current list of proposals we are pushing
	signer common.Address // Ethereum address of the signing key
	signFn SignerFn       // Signer function to authorize hashes with
	lock   sync.RWMutex   // Protects the signer fields
	// The fields below are for testing only
	fakeDiff bool // Skip difficulty verifications
}
这些字段的含义在注释中有介绍,这里补充说明。 其中,db字段是从本地磁盘读取Snapshot或者存储Snapshot到本地磁盘需要的,recents字段是最近使用的块的快照缓存,signatures字段是最常用的签名者地址最近使用的块缓存。 当获取某个区块对应的签名者的快照或地址时,会先去缓存中查找,如果有则直接从缓存中获取,否则计算对应的内容。 最后,提案字段包含当前节点的所有投票。 用户可以通过 RPC 接口添加他们想要的投票。 因此,当轮到他们创建区块时,就会生成相应的区块,并将想要的选票放入区块中并广播到网络中。
另外,我们还要观察和理解ecrecover()函数和snapshot()函数,分别用来获取一个区块的signer或者snapshot。
首先,对于ecrecover()函数,其定义如下:
// ecrecover extracts the Ethereum account address from a signed header.
func ecrecover(header *types.Header, sigcache *lru.ARCCache) (common.Address, error) {
	// If the signature's already cached, return that
	hash := header.Hash()
	if address, known := sigcache.Get(hash); known {
		return address.(common.Address), nil
	}
	// Retrieve the signature from the header extra-data
	if len(header.Extra) < extraSeal {
		return common.Address{}, errMissingSignature
	}
	signature := header.Extra[len(header.Extra)-extraSeal:]
	// Recover the public key and the Ethereum address
	pubkey, err := crypto.Ecrecover(SealHash(header).Bytes(), signature)
	if err != nil {
		return common.Address{}, err
	}
	var signer common.Address
	copy(signer[:], crypto.Keccak256(pubkey[1:])[12:])
	sigcache.Add(hash, signer)
	return signer, nil
}
其执行步骤如下:
获取区块头对应的hash 根据hash,先在缓存中查找(这个缓存就是Clique结构中的signatures字段),如果找到,则返回当前区块签名者的地址。 如果没有找到,提取区块头Extra字段中的签名信息。 通过签名信息,恢复出签名者的公钥,通过公钥得到签名者的地址。
对于snapshot()函数,其主要代码如下:
// snapshot retrieves the authorization snapshot at a given point in time.
func (c *Clique) snapshot(chain consensus.ChainHeaderReader, number uint64, hash common.Hash, parents []*types.Header) (*Snapshot, error) {
	// Search for a snapshot in memory or on disk for checkpoints
	var (
		headers []*types.Header
		snap    *Snapshot
	)
	for snap == nil {
		// If an in-memory snapshot was found, use that
		if s, ok := c.recents.Get(hash); ok {
			snap = s.(*Snapshot)
			break
		}
		// If an on-disk checkpoint snapshot can be found, use that
		if number%checkpointInterval == 0 {
			if s, err := loadSnapshot(c.config, c.signatures, c.db, hash); err == nil {
				...
				snap = s
				break
			}
		}
		// If we're at the genesis, snapshot the initial state. Alternatively if we're
		// at a checkpoint block without a parent (light client CHT), or we have piled
		// up more headers than allowed to be reorged (chain reinit from a freezer),
		// consider the checkpoint trusted and snapshot it.
		if number == 0 || (number%c.config.Epoch == 0 && (len(headers) > params.FullImmutabilityThreshold || chain.GetHeaderByNumber(number-1) == nil)) {
			checkpoint := chain.GetHeaderByNumber(number)
			if checkpoint != nil {
				hash := checkpoint.Hash()
				signers := make([]common.Address, (len(checkpoint.Extra)-extraVanity-extraSeal)/common.AddressLength)
				for i := 0; i < len(signers); i++ {
					copy(signers[i][:], checkpoint.Extra[extraVanity+i*common.AddressLength:])
				}
				snap = newSnapshot(c.config, c.signatures, number, hash, signers)
				if err := snap.store(c.db); err != nil {
					return nil, err
				}
				...
				break
			}
		}
		// No snapshot for this header, gather the header and move backward
		var header *types.Header
		if len(parents) > 0 {
			// If we have explicit parents, pick from there (enforced)
			header = parents[len(parents)-1]
			if header.Hash() != hash || header.Number.Uint64() != number {
				return nil, consensus.ErrUnknownAncestor
			}
			parents = parents[:len(parents)-1]
		} else {
			// No explicit parents (or no more left), reach out to the database
			header = chain.GetHeader(hash, number)
			if header == nil {
				return nil, consensus.ErrUnknownAncestor
			}
		}
		headers = append(headers, header)
		number, hash = number-1, header.ParentHash
	}
	// Previous snapshot found, apply any pending headers on top of it
	for i := 0; i < len(headers)/2; i++ {
		headers[i], headers[len(headers)-1-i] = headers[len(headers)-1-i], headers[i]
	}
	snap, err := snap.apply(headers)
	if err != nil {
		return nil, err
	}
	c.recents.Add(snap.Hash, snap)
	// If we've generated a new checkpoint snapshot, save to disk
	if snap.Number%checkpointInterval == 0 && len(headers) > 0 {
		if err = snap.store(c.db); err != nil {
			return nil, err
		}
		...
	}
	return snap, err
}
该函数的执行流程如下:
根据块号、块哈希和块的父块头信息,在循环中构建快照对象。 这时候,有四种情况。 循环结束后,我们知道如果获取到的快照是通过第四种情况构造的。 那么,它就不是当前块的快照了,所以需要使用后续所有的块头信息来更新获取到的快照,直到更新到当前块,从而得到当前块的快照。 最后需要将获取到的快照保存在缓存中,以备下次使用,同时也根据条件进行判断,决定是否将快照保存在磁盘中。验证块
区块的验证是为了达成共识。 只有经过验证的块才能被节点接收,并且只有这样的块才能在网络中传播。 验证区块的主要函数是VerifySeal(),其主要代码如下:
// VerifySeal implements consensus.Engine, checking whether the signature contained
// in the header satisfies the consensus protocol requirements.
func (c *Clique) VerifySeal(chain consensus.ChainHeaderReader, header *types.Header) error {
	return c.verifySeal(chain, header, nil)
}
// verifySeal checks whether the signature contained in the header satisfies the
// consensus protocol requirements. The method accepts an optional list of parent
// headers that aren't yet part of the local blockchain to generate the snapshots
// from.
func (c *Clique) verifySeal(chain consensus.ChainHeaderReader, header *types.Header, parents []*types.Header) error {
	// Verifying the genesis block is not supported
	number := header.Number.Uint64()
	if number == 0 {
		return errUnknownBlock
	}
	// Retrieve the snapshot needed to verify this header and cache it
	snap, err := c.snapshot(chain, number-1, header.ParentHash, parents)
	if err != nil {
		return err
	}
	// Resolve the authorization key and check against signers
	signer, err := ecrecover(header, c.signatures)
	if err != nil {
		return err
	}
	if _, ok := snap.Signers[signer]; !ok {
		return errUnauthorizedSigner
	}
	for seen, recent := range snap.Recents {
		if recent == signer {
			// Signer is among recents, only fail if the current block doesn't shift it out
			if limit := uint64(len(snap.Signers)/2 + 1); seen > number-limit {
				return errRecentlySigned
			}
		}
	}
	// Ensure that the difficulty corresponds to the turn-ness of the signer
	if !c.fakeDiff {
		inturn := snap.inturn(header.Number.Uint64(), signer)
		if inturn && header.Difficulty.Cmp(diffInTurn) != 0 {
			return errWrongDifficulty
		}
		if !inturn && header.Difficulty.Cmp(diffNoTurn) != 0 {
			return errWrongDifficulty
		}
	}
	return nil
}
区块验证的主要内容如下:
该区块的签名者在当前签名者列表中; 该块的签名者最近没有签名(在 SIGNER_LIMIT 内); 块的难度字段不是伪造的。
一个区块还有其他的验证,在函数VerifyHeader()中实现,包括区块时间戳的验证、Nonce、Extra等字段构造规范的验证等,这里不再赘述这里介绍的太多了。
打包块
当轮到签名者产生一个块时,签名者调用 Seal() 函数打包一个块并将其发送到网络。 该功能的代码虽然比较长,但是实现的主要功能比较简单,所以这里就不给出该功能对应的源码了。 但它的主要功能包括:
验证当前节点是否在签名者列表中(是否有权对区块进行签名) 验证当前节点最近是否对区块进行了签名。 如果它已经签署了区块,它将等待一段时间。 这个等待时间有一个具体的计算公式。 如果这个可以签名,则使用当前账户对区块头信息进行签名,放入Extra字段。
在调用 Seal() 函数之前,您需要调用 Prepare() 函数。 该函数的主要代码如下:
// Prepare implements consensus.Engine, preparing all the consensus fields of the
// header for running the transactions on top.
func (c *Clique) Prepare(chain consensus.ChainHeaderReader, header *types.Header) error {
	// If the block isn't a checkpoint, cast a random vote (good enough for now)
	header.Coinbase = common.Address{}
	header.Nonce = types.BlockNonce{}
	number := header.Number.Uint64()
	// Assemble the voting snapshot to check which votes make sense
	snap, err := c.snapshot(chain, number-1, header.ParentHash, nil)
	if err != nil {
		return err
	}
	if number%c.config.Epoch != 0 {
		c.lock.RLock()
		// Gather all the proposals that make sense voting on
		addresses := make([]common.Address, 0, len(c.proposals))
		for address, authorize := range c.proposals {
			if snap.validVote(address, authorize) {
				addresses = append(addresses, address)
			}
		}
		// If there's pending proposals, cast a vote on them
		if len(addresses) > 0 {
			header.Coinbase = addresses[rand.Intn(len(addresses))]
			if c.proposals[header.Coinbase] {
				copy(header.Nonce[:], nonceAuthVote)
			} else {
				copy(header.Nonce[:], nonceDropVote)
			}
		}
		c.lock.RUnlock()
	}
	// Set the correct difficulty
	header.Difficulty = calcDifficulty(snap, c.signer)
	// Ensure the extra data has all its components
	if len(header.Extra) < extraVanity {
		header.Extra = append(header.Extra, bytes.Repeat([]byte{0x00}, extraVanity-len(header.Extra))...)
	}
	header.Extra = header.Extra[:extraVanity]
	if number%c.config.Epoch == 0 {
		for _, signer := range snap.signers() {
			header.Extra = append(header.Extra, signer[:]...)
		}
	}
	header.Extra = append(header.Extra, make([]byte, extraSeal)...)
	// Mix digest is reserved for now, set to empty
	header.MixDigest = common.Hash{}
	// Ensure the timestamp has the correct delay
	parent := chain.GetHeader(header.ParentHash, number-1)
	if parent == nil {
		return consensus.ErrUnknownAncestor
	}
	header.Time = parent.Time + c.config.Period
	if header.Time < uint64(time.Now().Unix()) {
		header.Time = uint64(time.Now().Unix())
	}
	return nil
}
Its main function is to construct each field in the header of the block to be signed (except that the signature is completed in the Seal() function), where the address of the voter is randomly selected from the proposals field of the Clique structure get one.
other consensus
There are also some consensus mechanisms that have not been given specific implementations in Ethereum, but they are widely used consensus algorithms. Some commonly used consensus algorithms are summarized below:
Specific instructions can be found here
参考
[1] Analysis of Ethereum source code: clique of consensus algorithm
[2] Analysis of the source code of Ethereum: ethash of the consensus algorithm (theoretical introduction)
[3] Analysis of Ethereum source code: ethash of consensus algorithm (source code)